Colorful Bacon and Chive Deviled Eggs
1 dozen eggs
1/2 c. Mayonnaise
2 T. Dijon Mustard
1/2 lb. bacon or a bag of bacon bits (do not use imitation bacon bits)
Chives
Fresh Cracked Pepper (to your liking)
Dash of hot sauce (my secret ingredient!)
1 T. White Vinegar or Cider Vinegar per color of food coloring you are using
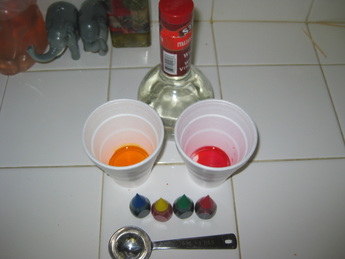
1/2 c. Boiling Water per color you useFood Coloring Ramekins or cups
DIRECTIONS
Cut bacon into bits and fry up. When done set aside to drain fat on paper towel.
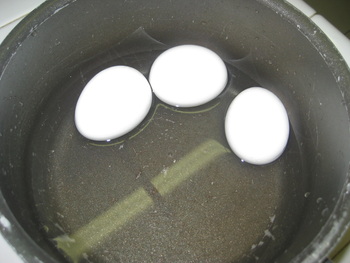
Put eggs in a pot, cover with water and boil. Once eggs are boiling turn down to a simmer for about 10-15 minutes. When done, run cold water over eggs until cooled. While eggs are cooling get together your food coloring, vinegar, cups/ramekins and start boiling your water.
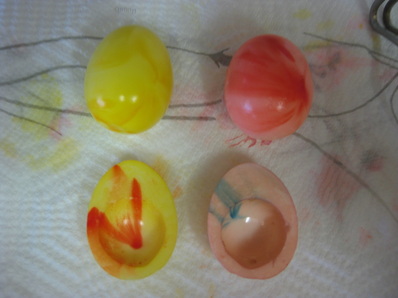
For every food color you choose, you will need 1/2 cup of boiling water for it. Add the vinegar to the cups/ramekins and 2-4 drops of food coloring in each one. When water is done boiling add the water to cups/ramekins.
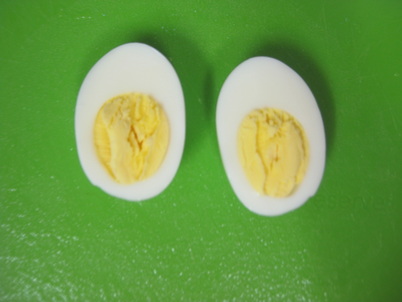
Remove shells of eggs and rinse to make sure no egg shells are left on. On a cutting board slice each egg in half and remove yolks placing them in a medium sized bowl.
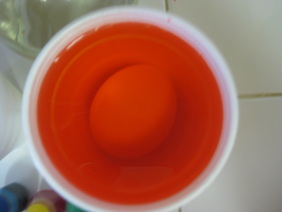
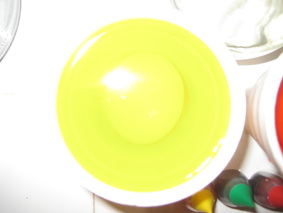
Once all the yolks are removed set the bowl aside and add the whites of the eggs to your food coloring. While the eggs are soaking up their coloring, lay out paper towels to dry and drain the eggs. I generally only use 3 layers of paper towels. There is no set time on the length of time the eggs are needed to stay in the water, it is until you are satisfied with the color.
Meanwhile use fork to mash the yolks of the eggs until a crumbly consistency appears. Then add mayonnaise until creamy. You can add more or less mayonnaise depending on your taste and you can use low fat or non fat mayonnaise as well, merely up to you. Next add the Dijon mustard and pepper and stir until combined.
I use a Ziploc baggie to re-distribute the egg yolk back into the egg. So next step is to take the egg yolk mixture and place into a small quart sized Ziploc baggie. I get all the air out and refrigerate until I am ready to use. Refrigerating it makes it easier to use in my opinion once it firms up a bit.
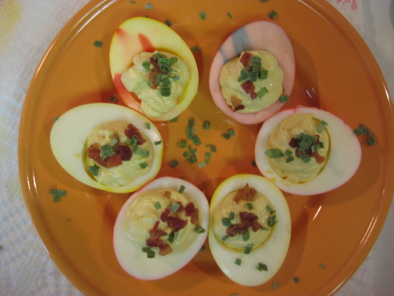
After all eggs are colored and dried, place neatly on a pretty serving platter, get your Ziploc baggie out and carefully cut the very corner tip off. The smaller the cut the better, you will have more control on how you fill the egg and if it is too small you can always cut a little more. If you cut too much it will just run everywhere.
Fill the eggs, you will have more than enough to fill all eggs and sometimes I will have to go back and add more once they all are filled. Once you are happy with the amount of filling, get your bacon bits and add to the top of the deviled egg, then add a few chives.
Next watch your family, guests and friends smile from ear to ear when they see your colorful creations!!
HINT: You don't want to overpower the deviled egg with the bacon and chives. This is just an additive to make deviled eggs "funner" I add a few bacon bits and a few chives, but you may like more or less.
1/2 c. Mayonnaise
2 T. Dijon Mustard
1/2 lb. bacon or a bag of bacon bits (do not use imitation bacon bits)
Chives
Fresh Cracked Pepper (to your liking)
Dash of hot sauce (my secret ingredient!)
1 T. White Vinegar or Cider Vinegar per color of food coloring you are using
1/2 c. Boiling Water per color you useFood Coloring Ramekins or cups
DIRECTIONS
Cut bacon into bits and fry up. When done set aside to drain fat on paper towel.
Put eggs in a pot, cover with water and boil. Once eggs are boiling turn down to a simmer for about 10-15 minutes. When done, run cold water over eggs until cooled. While eggs are cooling get together your food coloring, vinegar, cups/ramekins and start boiling your water.
For every food color you choose, you will need 1/2 cup of boiling water for it. Add the vinegar to the cups/ramekins and 2-4 drops of food coloring in each one. When water is done boiling add the water to cups/ramekins.
Remove shells of eggs and rinse to make sure no egg shells are left on. On a cutting board slice each egg in half and remove yolks placing them in a medium sized bowl.
Once all the yolks are removed set the bowl aside and add the whites of the eggs to your food coloring. While the eggs are soaking up their coloring, lay out paper towels to dry and drain the eggs. I generally only use 3 layers of paper towels. There is no set time on the length of time the eggs are needed to stay in the water, it is until you are satisfied with the color.
Meanwhile use fork to mash the yolks of the eggs until a crumbly consistency appears. Then add mayonnaise until creamy. You can add more or less mayonnaise depending on your taste and you can use low fat or non fat mayonnaise as well, merely up to you. Next add the Dijon mustard and pepper and stir until combined.
I use a Ziploc baggie to re-distribute the egg yolk back into the egg. So next step is to take the egg yolk mixture and place into a small quart sized Ziploc baggie. I get all the air out and refrigerate until I am ready to use. Refrigerating it makes it easier to use in my opinion once it firms up a bit.
After all eggs are colored and dried, place neatly on a pretty serving platter, get your Ziploc baggie out and carefully cut the very corner tip off. The smaller the cut the better, you will have more control on how you fill the egg and if it is too small you can always cut a little more. If you cut too much it will just run everywhere.
Fill the eggs, you will have more than enough to fill all eggs and sometimes I will have to go back and add more once they all are filled. Once you are happy with the amount of filling, get your bacon bits and add to the top of the deviled egg, then add a few chives.
Next watch your family, guests and friends smile from ear to ear when they see your colorful creations!!
HINT: You don't want to overpower the deviled egg with the bacon and chives. This is just an additive to make deviled eggs "funner" I add a few bacon bits and a few chives, but you may like more or less.
|
|